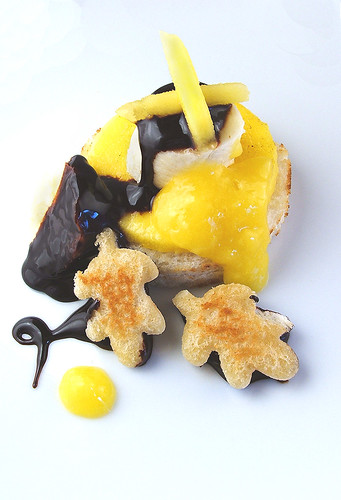
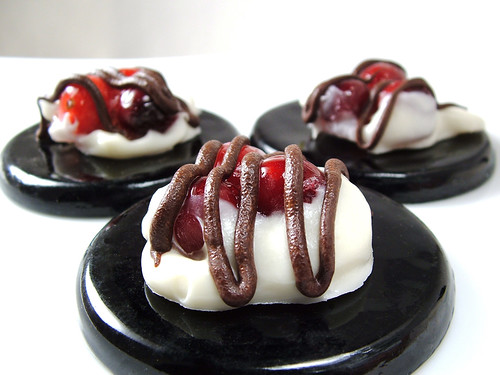
Mango Banana Chocolate dessert
Published by nika on Tuesday, January 31, 2006 at 9:30 AM.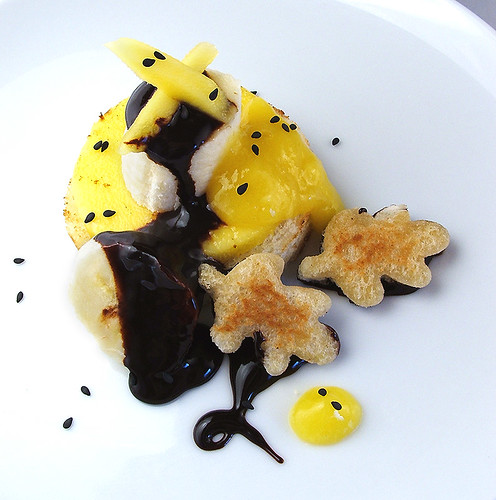
I continue to look for ways to use my chocolate sauce (this is what happens when you use a pound of chocolate!).
I had a ripe mango on hand and felt like assembling it into a dessert with various textures. I made a smoothie from the remainder of the mango (that is always good :-)
Recipe
Mango Banana Chocolate dessert
Ingredients:
1 ripe mango
1 banana
2 pieces of bread/pound cake
Chocolate sauce
Mango Puree
Directions:
Remove skin from mango, make a large slice, cut into round shape, saute lightly in a medium sauce pan to lend it a light color and warmth. Puree some mango to add to serving plate.
Cut out a round and several accent shapes from bread/cake, toast a bit in your saute pan.
Dip accent shapes into chocolate.
Slice banana.
Arrange all as desired.
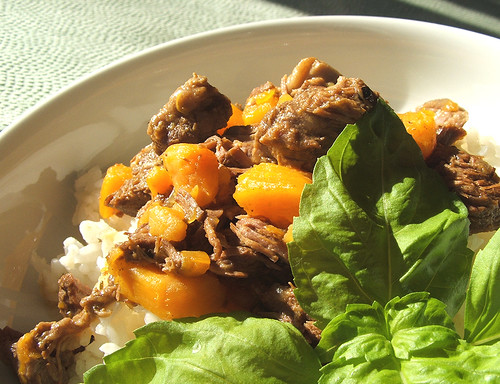
Beef and Sweet Potato Stew
Published by nika on Monday, January 30, 2006 at 9:24 AM.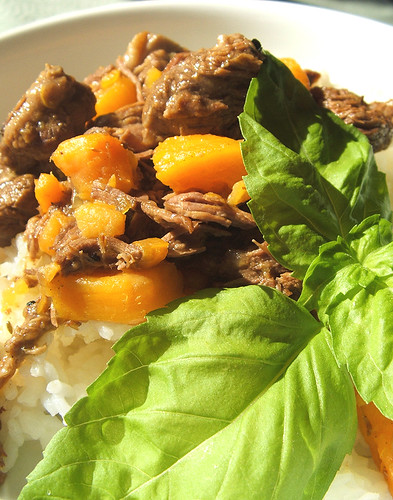
My part of the world remains somewhat chilly (tho nothing like it is usually) and so its a great time to make soups and stews. I had a pot roast on hand and was wondering what to do with it. The last more traditional pot roast I made (whole, cooked in dutch oven for hours) came out less than tender, I was not that happy with that.
This time I decided to break the pot roast down into stew meat to expose all of that connective tissue to the heat and liquid. WOW, it really worked this time. This stew only gets better the next day too.
I used sweet potatoes initially because 1) I was tired of white potatoes and 2) I remember hearing that sweet potatoes are more healthy for you.
I learned one really important thing: sweet potatoes hold up very nicely to a stew. Instead of melting into a nasty odd glutinous mess on the bottom of the pot when you try to reheat it the next day, the sweet potatoes are still delicate tender bundles of flavor.
Beef and Sweet Potato Stew
Ingredients:
4-5 pounds of pot roast, cut up into 2 inch cubes
2 tablespoons Paul Prudhommes Poultry Seasoning (you can use other types, up to you)
2 tsp salt
1 tsp ground pepper
All purpose flour, enough to coat all meat cubes
Olive oil, enough to brown off successive batches of the meat cubes
3/4 large white onion, diced small (I tend to use sweet onions, the type with a lower sulpher content)
1 medium packet Goya Sazon Azafran (or saffron if you can)
2 large sweet potatoes, peeled and diced into 1.5 inch cubes
Water to cover the stew several inches
Directions:
Heat a few tablespoons of olive oil in the pot you will be using to make the stew.
Mix flour, seasoning mix, salt, and pepper.
Dust meat cubes with this flour, shake off excess, brown in small batches in the stew pot. You want the cubes to have room to brown so that they develop a brown crust and dont just steam each other into a nasty gelatinous cube mess. Remove the batch of browned cubes to a plate and brown the next batch.
Once you have browned all the meat cubes add the diced onion to the stew pot, which is on a medium low heat. As the onions sweat and release liquid, scrub the bottom of the pot with your stirring spoon to get the browned meat juices and flour up off the bottom and dissolved in with the onions.
Add the Goya seasoning to the onions and mix well.
Add browned meat back to the stew pot (along with any juices that seeped out while the cubes were sitting on the plates) and mix well.
Add diced sweet potato.
Add room temperature water to cover the stew by several inches and simmer gently for some hours (5 before initial serving).
This tastes excellent the next day. On the first night, place stew in a cold location, skim off the excess fat in the morning, and put on to warm. Do not heat too quickly.
Enjoy!
Copyright 2006 Nika for both pictures and recipe
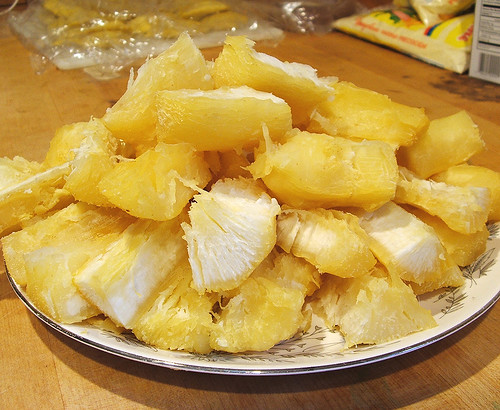
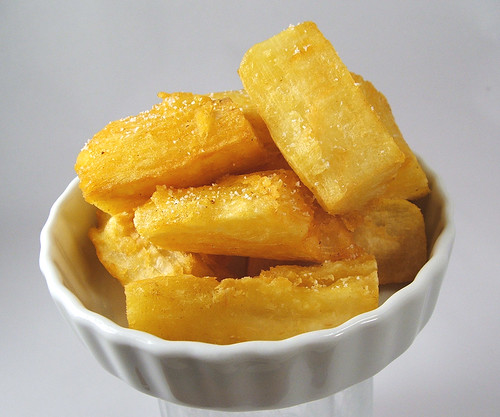
Yucas Fritas (Fried Yucas or Cassava Root) Recipe and How 2 photos
Published by nika on Sunday, January 29, 2006 at 9:41 AM.
I had posted a pic in December of fried yucas but had not yet gotten around to putting the how to pics up yet. If you enjoy these, stop by in a few weeks when I get my how-2 guides up and running for sale at a publish-on-demand site. I need to reshoot a few pics and then proof the book before I put it up for sale.
Yucas Fritas Recipe
2 packages of frozen yuca from the latino food store
1 packet of Goya "sazon"
2 chopped garlic cloves
2 green onions coarsely chopped
1 cube of chicken bullion
1 tsp cominos
salt to taste
1 quarts of water
Place the yucas, all other ingredients and water in a stew pot. Make sure
that the water covers the yucas. Bring to a boil, lower heat to a simmer
and cook until the yucas are tender, about 45 minutes. Drain yucas in a
colander. Let cool. Remove the center woody stems in the center of the
yucas. Split the yucas lengthwise and then in half. You should have
little finger sized pieces of yuca, so you may have to do some more
splitting on the bigger pieces. Fry them in hot oil until crisp and drain
on a paper towel. Serve immediately. These fried yucas will stay crispy for
about an hour or so.
How-2 pics
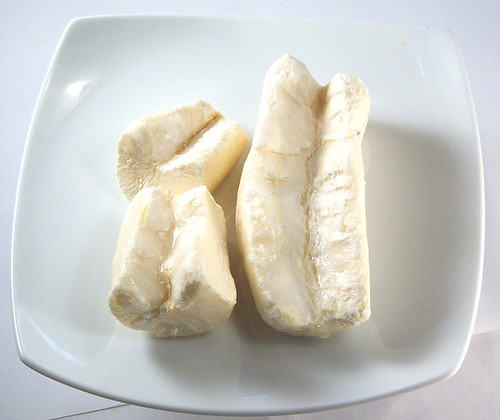
Frozen yuca right from the package.
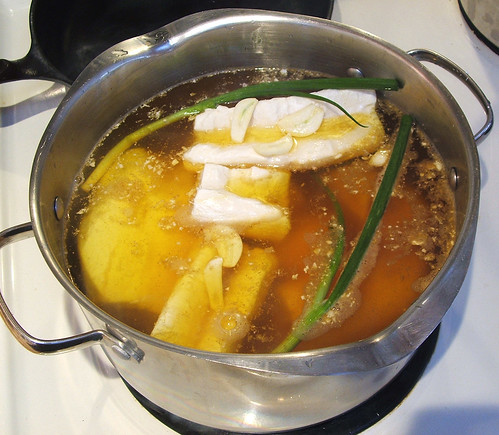
Boil yucas in water, onions, garlic, and sazon azafran.
Cut boiled yuca into bite-size pieces. Note the lovely golden color from boiling in the azafran. If your back account is bursting at the seams, splurge and use saffron in the water instead of the azafran. My account never bursts at the seams but it does bust (wink).
Fry them up to golden brown, salt to taste, eat and then help the cook clean up! If your cook is like my grandma, you will not be allowed in the kitchen to help before or after and thus the yucas are flavored with that very special ingredient, guilt :-). Adding a bit more salt and some butter helps to hide that guilt flavor.
Related Posts:
- How-2 guide on how to make Platanos (fried plantains or tostones)
- Yucas Fritas (Fried Yucas or Cassava Root) Recipe and How 2 photos
- Empanadas - The Recipe
- Flash Flickr Movie of How to make Colombian Empanadas
- Chicharron - Deep fried pork belly - How To
- How to make Colombian Empanadas - directions
- Latest full recipe for Colombian Bunuelos (2006 post)
- Last year's Christmas Bunuelo Decadence
- A Colombian breakfast How-2 guide
- Colombian Frescos
- Lechona preparation
Technorati Tags:
Colombia, Yucas, Fritas, Fritanga, fried, recipe, receta, photograph, photography, Colombian, cassava, root
Cappuccino - Well Fed Network article - The Spirit World
Published by nika on Saturday, January 28, 2006 at 8:38 AM.
I posted the following article (Part 2 of 2) at The Spirit World, a blog in the Well Fed Network.
Please cruise by The Spirit World and The Well Fed Network and check out this new venture!
Cappuccino

In my previous post at the Well Fed Network, I wrote about Italian coffee concoctions that did a great job of extrapolating from a base of black brew. Clearly, the Italians have done an excellent job maximizing coffee in cocktails. But before the creative and perhaps, at times, cloying cocktails, was the simplicity of a black espresso with a twist of lime and the comforting capuccino.
For a point of reference, I am a Colombian-American and I like my coffee strong. I won't wax on about the need for that intensity other than to say that I appreciate it in other types of coffee. My experience with coffee in Colombia has been very low tech. I remember a cloth hung from a wire above my cup, coffee packed inside, and hot water poured over the top. Italian coffee, with its massive, complicated, steamy coffee making machines, seems to involve a whole lot more technology than what I grew up with.
Italian espresso machines cross the line from utility to high octane machinery. The barrista, behind the steaming fury of the milk frother, hidden with my little cup of espresso, would likely feel just as comfortable adjusting the spark plugs of a Maserati, while it's still running.
But it is very hard to complain as you look down into the creamy foam-edged carmel depths of a good espresso or the delicate felt on the surface of a cappuccino. Leaving the gleaming mass of high-tech coffee machine behind, I can sit in the café and sip divine coffee beauty, too content to compare, only to enjoy.
Just how does the barrista harness that machine that seems like its bulging with steam to make tiny little potent espressos and whispy froths for lattes? From the experts on Italian coffee, illy, comes an exacting set of directions for making a cappuccino, Italian style.

Cappuccino Italian Style
The ceramic container - or, if not available, one made out of stainless steel - should be twice as large as the volume of milk to be heated; in addition, the container's optimal diameter is 1/3 of its height.
The temperature of the cup is irrelevant, but the milk's temperature should not exceed 70°C (158°F). It should never be heated a second time without at least adding some fresh milk. It is heated up by means of the steam nozzle of the "espresso machine" after discharging any condensed water which may have collected in the nozzle. The foam should be fine and dry, compact and lasting.
Proportions:
1/3 espresso coffee
1/3 milk (preferably whole milk)
1/3 foam
Preparation:
1. Pour the necessary quantity of milk in the container.
2. Discharge any condensed water which may have collected in the steam nozzle by opening the steam tap for 2-3 seconds.
3. Immerse the steam nozzle in the milk and open the tap.
4. Once the foam has reached the desired consistency and volume, prepare the espresso in a large cup (max 120cc).
5. Pour the milk and the foam in the cup with the espresso coffee, keeping in mind that the proportions are 1/3 for each component.
TIPS:
a. To obtain dryer foam, the pressure of the boiler should be above 0.7 atmospheres; hit the container (with the milk foam) hard on the counter a couple of times before you pour it.
b. To obtain a fine cream, use a spoon to remove the layer of large bubbles after the first heating, restricting the operation to the foam only.
c. Prepare the milk before the espresso if you wish to have the center of foam colored. Proceed in the opposite manner if you wish the foam to obtain a colored contour.
d. To give a greater intensity to the taste of the espresso, prepare two extra strong espresso coffee ("ristretti"). Thanks to the low caffeine content of illy coffee, even in this case 130-140 mg of caffeine per cappuccino are never exceeded.
e. Refrigerate the milk container.
Cocoa powder, though optional, is sometimes sprinkled on top of the cappuccino, often to cover imperfections.
(FYI: Ristretto is a very short shot of espresso coffee. A normal (double) espresso shot is a 2 fl.oz or 0.6 DL extraction over 25-30 seconds. A (double) ristretto is a 1-1.5 fl.oz (0.3-0.45 DL) extraction with the same amount of ground coffee over the same period of time. Ristretti is the plural of ristretto. Source.)
Whew, that is some protocol for using a set of Maserati spark plugs to make a cup of coffee.
While you are at it, you may wish to indulge in extravagant scientifically rigorous caffeinated adventures as do Dr.s Andrew Smith and David Thomas, scientists in the Department Of Chemical Engineering at Loughborough University, UK. They have an interesting site that discusses Coffee Science and the vagaries of the infusion of coffee solubles. (Check out the following PDF of a scientific article that discusses the extraction kinetics of coffee brewing, at length. The Infusion of Coffee Solubles into Water: Effect of Particle Size and Temperature.)
Books of Interest
Please cruise by The Spirit World and The Well Fed Network and check out this new venture!
Cappuccino
In my previous post at the Well Fed Network, I wrote about Italian coffee concoctions that did a great job of extrapolating from a base of black brew. Clearly, the Italians have done an excellent job maximizing coffee in cocktails. But before the creative and perhaps, at times, cloying cocktails, was the simplicity of a black espresso with a twist of lime and the comforting capuccino.
For a point of reference, I am a Colombian-American and I like my coffee strong. I won't wax on about the need for that intensity other than to say that I appreciate it in other types of coffee. My experience with coffee in Colombia has been very low tech. I remember a cloth hung from a wire above my cup, coffee packed inside, and hot water poured over the top. Italian coffee, with its massive, complicated, steamy coffee making machines, seems to involve a whole lot more technology than what I grew up with.
Italian espresso machines cross the line from utility to high octane machinery. The barrista, behind the steaming fury of the milk frother, hidden with my little cup of espresso, would likely feel just as comfortable adjusting the spark plugs of a Maserati, while it's still running.
But it is very hard to complain as you look down into the creamy foam-edged carmel depths of a good espresso or the delicate felt on the surface of a cappuccino. Leaving the gleaming mass of high-tech coffee machine behind, I can sit in the café and sip divine coffee beauty, too content to compare, only to enjoy.
Just how does the barrista harness that machine that seems like its bulging with steam to make tiny little potent espressos and whispy froths for lattes? From the experts on Italian coffee, illy, comes an exacting set of directions for making a cappuccino, Italian style.
Cappuccino Italian Style
The ceramic container - or, if not available, one made out of stainless steel - should be twice as large as the volume of milk to be heated; in addition, the container's optimal diameter is 1/3 of its height.
The temperature of the cup is irrelevant, but the milk's temperature should not exceed 70°C (158°F). It should never be heated a second time without at least adding some fresh milk. It is heated up by means of the steam nozzle of the "espresso machine" after discharging any condensed water which may have collected in the nozzle. The foam should be fine and dry, compact and lasting.
Proportions:
1/3 espresso coffee
1/3 milk (preferably whole milk)
1/3 foam
Preparation:
1. Pour the necessary quantity of milk in the container.
2. Discharge any condensed water which may have collected in the steam nozzle by opening the steam tap for 2-3 seconds.
3. Immerse the steam nozzle in the milk and open the tap.
4. Once the foam has reached the desired consistency and volume, prepare the espresso in a large cup (max 120cc).
5. Pour the milk and the foam in the cup with the espresso coffee, keeping in mind that the proportions are 1/3 for each component.
TIPS:
a. To obtain dryer foam, the pressure of the boiler should be above 0.7 atmospheres; hit the container (with the milk foam) hard on the counter a couple of times before you pour it.
b. To obtain a fine cream, use a spoon to remove the layer of large bubbles after the first heating, restricting the operation to the foam only.
c. Prepare the milk before the espresso if you wish to have the center of foam colored. Proceed in the opposite manner if you wish the foam to obtain a colored contour.
d. To give a greater intensity to the taste of the espresso, prepare two extra strong espresso coffee ("ristretti"). Thanks to the low caffeine content of illy coffee, even in this case 130-140 mg of caffeine per cappuccino are never exceeded.
e. Refrigerate the milk container.
Cocoa powder, though optional, is sometimes sprinkled on top of the cappuccino, often to cover imperfections.
(FYI: Ristretto is a very short shot of espresso coffee. A normal (double) espresso shot is a 2 fl.oz or 0.6 DL extraction over 25-30 seconds. A (double) ristretto is a 1-1.5 fl.oz (0.3-0.45 DL) extraction with the same amount of ground coffee over the same period of time. Ristretti is the plural of ristretto. Source.)
Whew, that is some protocol for using a set of Maserati spark plugs to make a cup of coffee.
While you are at it, you may wish to indulge in extravagant scientifically rigorous caffeinated adventures as do Dr.s Andrew Smith and David Thomas, scientists in the Department Of Chemical Engineering at Loughborough University, UK. They have an interesting site that discusses Coffee Science and the vagaries of the infusion of coffee solubles. (Check out the following PDF of a scientific article that discusses the extraction kinetics of coffee brewing, at length. The Infusion of Coffee Solubles into Water: Effect of Particle Size and Temperature.)
Books of Interest
Italian Coffee - Well Fed Network article - The Spirit World
Published by nika on Friday, January 27, 2006 at 9:59 AM.
I posted the following article (Part 1 of 2 actually) at The Spirit World, a blog in the Well Fed Network.
Please go on by The Spirit World and The Well Fed Network and cruise all the amazing articles we have been putting up there!
I promise you will learn a thing or two.
Italian Coffee

As a counterpoint, of sorts, to the post on Italian Grappa, this post will discuss that OTHER amazing drink, Italian Coffee.
As you likely know, there is more to Italian coffee than espresso and cappuccino. Thanks to Starbucks and local cafés across the US, we have developed a taste for Lattes and Frapuccinos and many other drinks that may have never seen the light of day in Italia. (Except for the Starbucks there, I suppose). There are plenty of indigenous Italian coffees that deserve our attention and I will mention a few here, with their recipes.
The use of alcohol is a lovely way to amend a coffee. Some Italian coffees call for it, others do not.
Recipes
This first recipe calls for Grappa and would make a tasty after-dinner drink that will keep you up to watch the sunrise.
Espresso Corretto – 1 serving
Combine one shot of espresso and a 1/2 teaspoon of Italian Grappa (or to taste, do not dilute the brew too much), and knock it back.
This next drink sounds like a delightful ice breaker for a party that plans to last late into the night.
Caffè all'Arancia – 4 servings
2 cups of boiling coffee, 1 tsp. ground orange peel, 4 shots of Cognac, whipped cream to top. Mix the coffee with the sugar, orange peel and Cognac. Pour into cups and top with whipped cream and a strip of peel.
The following recipe makes a drink that would be great on a hot afternoon, invigorating and cooling both in temperature and aroma.
Caffè Profumatissimo - 4 servings
4 cups of very strong coffee, 1T. sugar, a few mint leaves, whole cloves. Prepare the coffee, add sugar and set aside. Pour cooled coffee into a carafe with ice cubes. Add a few cloves and several mint leaves.
This next one is so extravagant I get a milk-coffee foam mustache just reading it.
Caffè Imperiale - 4 servings
1 very strong cup of coffee, 4 egg yolks, 4T. sugar, 1 Cup milk, 3 shots brandy. Beat the egg yolks well, stirring in the sugar and brandy. Add to heated milk and coffee. Serve in heated punch cups.
(The previous three recipes can be found at the DolceVita site.)
Or, you may simply wish to indulge in a cup of hot java, black and no sugar, contemplating only the depth of flavor and perhaps pleasant associated memories. In any context, this brew faithfully serves as a constant, anchoring the greater mixological infusion in the authentic and earthy reality of coffee.
Visit The Spirit World Cappuccio post where I delve into the intricacies of the making of a cappuccino.
Books of Interest
Please go on by The Spirit World and The Well Fed Network and cruise all the amazing articles we have been putting up there!
I promise you will learn a thing or two.
Italian Coffee
As a counterpoint, of sorts, to the post on Italian Grappa, this post will discuss that OTHER amazing drink, Italian Coffee.
As you likely know, there is more to Italian coffee than espresso and cappuccino. Thanks to Starbucks and local cafés across the US, we have developed a taste for Lattes and Frapuccinos and many other drinks that may have never seen the light of day in Italia. (Except for the Starbucks there, I suppose). There are plenty of indigenous Italian coffees that deserve our attention and I will mention a few here, with their recipes.
The use of alcohol is a lovely way to amend a coffee. Some Italian coffees call for it, others do not.
Recipes
This first recipe calls for Grappa and would make a tasty after-dinner drink that will keep you up to watch the sunrise.
Espresso Corretto – 1 serving
Combine one shot of espresso and a 1/2 teaspoon of Italian Grappa (or to taste, do not dilute the brew too much), and knock it back.
This next drink sounds like a delightful ice breaker for a party that plans to last late into the night.
Caffè all'Arancia – 4 servings
2 cups of boiling coffee, 1 tsp. ground orange peel, 4 shots of Cognac, whipped cream to top. Mix the coffee with the sugar, orange peel and Cognac. Pour into cups and top with whipped cream and a strip of peel.
The following recipe makes a drink that would be great on a hot afternoon, invigorating and cooling both in temperature and aroma.
Caffè Profumatissimo - 4 servings
4 cups of very strong coffee, 1T. sugar, a few mint leaves, whole cloves. Prepare the coffee, add sugar and set aside. Pour cooled coffee into a carafe with ice cubes. Add a few cloves and several mint leaves.
This next one is so extravagant I get a milk-coffee foam mustache just reading it.
Caffè Imperiale - 4 servings
1 very strong cup of coffee, 4 egg yolks, 4T. sugar, 1 Cup milk, 3 shots brandy. Beat the egg yolks well, stirring in the sugar and brandy. Add to heated milk and coffee. Serve in heated punch cups.
(The previous three recipes can be found at the DolceVita site.)
Or, you may simply wish to indulge in a cup of hot java, black and no sugar, contemplating only the depth of flavor and perhaps pleasant associated memories. In any context, this brew faithfully serves as a constant, anchoring the greater mixological infusion in the authentic and earthy reality of coffee.
Visit The Spirit World Cappuccio post where I delve into the intricacies of the making of a cappuccino.
Books of Interest
Enrobing the world
Published by nika on Thursday, January 26, 2006 at 8:26 AM.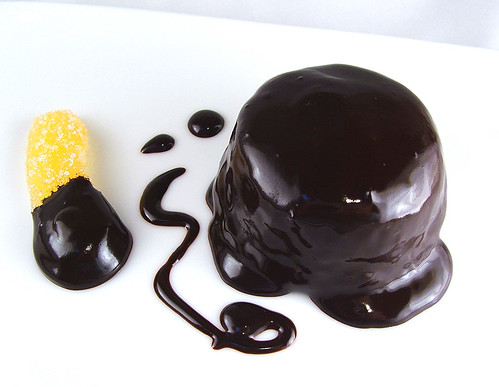
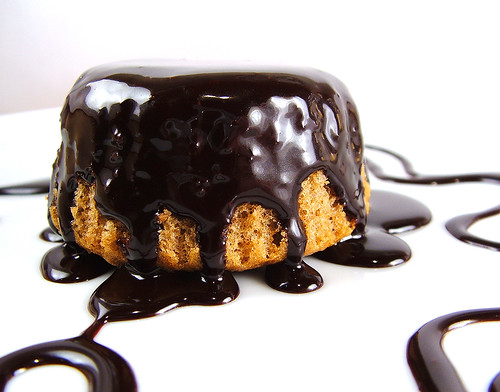
Having more fun with my chocolate sauce.
Homemade Dark Chocolate Sauce - nothing like the store bought! [recipe]
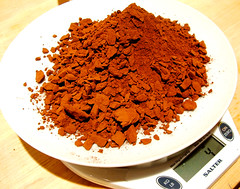
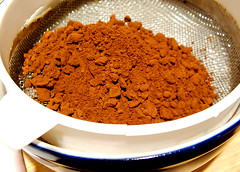
Published by nika on Tuesday, January 24, 2006 at 8:04 AM.
This chocolate sauce is astounding in how delicious it is and how beautifully it coats things.
A Flickr Flash slideshow of these photos is shown at the end of this post.
As a starting point, I pulled out my trusty and, as yet underused, pastry culinary textbook from the Culinary Institute of America (CIA) called The Professional Pastry Chef: Fundamentals of Baking and Pastry, 4th Edition. (I love to curl up with this book, even when I have no intention of cooking anything that day, and read all of the fascinating techniques and directions that give rise to some beautiful and classic desserts. I love this book, period.)
It had a deceptively simple looking recipe for chocolate sauce on page 820. I documented my experience with this and am sharing it here.
Chocolate Sauce
Yield: about 4 ½ cups (1 liter, 80 mls)
The equipment you will need:
A good scale (mine is electronic, goes metric if I need it)
Double boiler or an analogous set up (see my pics below for how I jury rigged it)
A small sauce pan
Various smaller bowls
Large metal bowl
Strainer
Ingredients:
2 cups (480 mls) water
10 ounces (285 g) granulated sugar (PLEASE use your scale for this, this is not a volumetric measure)
1/2 cup (120 ml) glucose or light corn syrup (This IS volumetric, use the measuring cup)
4 ounces (115 g) unsweetened cocoa powder, sifted (I used Hershey’s Dutch Processed) (Use the scale here, this is not volumetric)
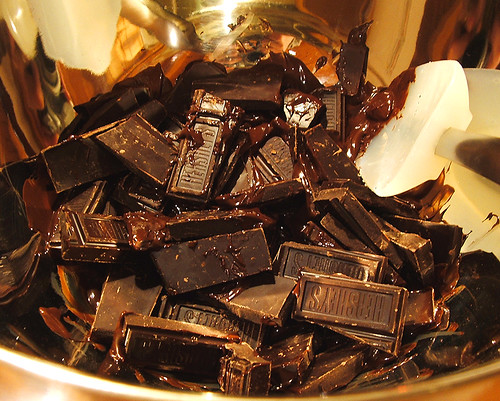
1 pound (455 g) sweet dark chocolate, melted (I just went by the weights on the chocolate bars)
Directions:
Read these directions several times and imagine doing this process. You will need to have various things happening at the same time.
You need to sift the powdered chocolate and you need to have your chocolate melting and holding at a temperature that is not too warm.
1) In the small sauce pan heat water, sugar, and the glucose/corn syrup until this solution boils. Remove from heat.
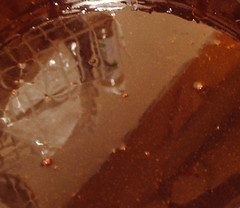
2) Have ready the sifted powdered chocolate in a medium bowl. Add some of the syrup and mix into a paste. Add more syrup until all of the syrup is incorporated into the powdered chocolate. This is MUCH easier said than done! The powdered chocolate and the syrup doesn't want to get together perfectly, you may get lumps, work on them for all your worth. When you cant take that any longer, be sure to strain this chocolate syrup to remove lumps before the next step.

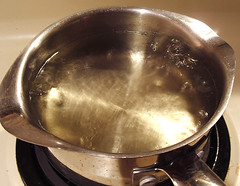
Be melting your chocolate simultaneously! I made a double boiler by putting a ring of crumpled foil in a pan, added water to the pan and heated water at medium heat, didn't even simmer. I paid close attention to the chocolate as it melted and stirred it occasionally to distribute heat gently.
Hold it at the consistency shown below, not too hot (do not want to kill this lovely stuff!).

3) Add the chocolate syrup to the melted chocolate. This too is not as simple as it sounds and it might scare you when you start because your dreamy melted chocolate, when you add your warm chocolate syrup, doesn't look so dreamy anymore!
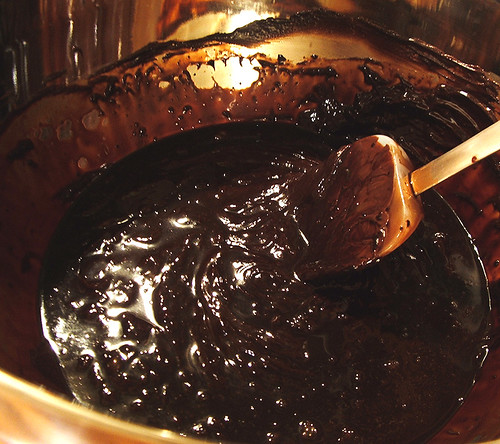
Don't add all of the syrup at a time and when you have added some syrup, stir the melted chocolate well until it is incorporated and the lumpiness disappears.
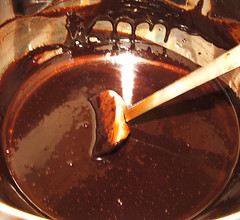
Repeat until your syrup has been incorporated.
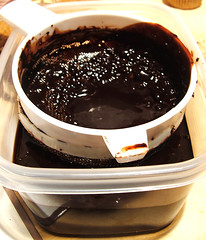
4) Pour finished chocolate sauce into storage container through a strainer to catch any last lumps. Store in the refrigerator, warm when you need a thinner sauce, use cool to coat pears and other desirables.
5) Enjoy!
Flickr Flash slide show of how to make a dark chocolate sauce.
Its all for the birds
Published by nika on Monday, January 23, 2006 at 1:44 PM.
We have been making our bi-monthly beef stock and I didnt want to trow out the fat that cooked out of the roasting bones.
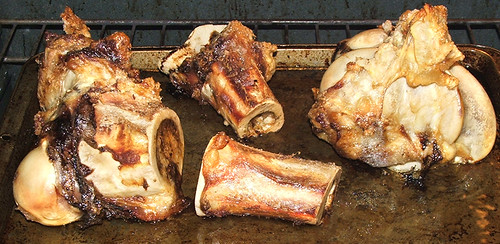
So I poured it into a container and let it cool to a spreadable consistency.
Now comes the fun part! Making Suet Bird feeders.
- to the cooled spreadable suet add your favorite wild bird mix, nuts, rolled oats, peanut butter, popcorn, cooked rice, etc.
- Once it is well mixed, put it into a mesh bag (like some fruit come in) and put it into the freezer to harden.
- When its cold outside and the birds are hankering for food, hang mesh bag out, away from predator's reach and enjoy the show!
Passionate Pink Valentines
Published by nika on Saturday, January 21, 2006 at 2:21 PM.
I just wanted to share with you these very sweet pink dishes, bowls, and ramekins I saw at Williams and Sonoma.
Ramekins

Bowls and Plates


Mixing Bowls

Pink Spatulas

A sweet little hearts baking mold

A pink apron

A pink KitchenAid

By the time you are done buying all these things, you will be done with the pink and ready to move on to the passionate reds.
But before you saturate, try these pink champagne chocolate truffles from the Chocolate Trading Company!

Ramekins
Bowls and Plates
Mixing Bowls
Pink Spatulas
A sweet little hearts baking mold
A pink apron
A pink KitchenAid
By the time you are done buying all these things, you will be done with the pink and ready to move on to the passionate reds.
But before you saturate, try these pink champagne chocolate truffles from the Chocolate Trading Company!
Chocolate dreams
Published by nika on at 9:39 AM.
The chocolate heart that broke my heart. I only poured one mold full and when I was removing it, it snapped. I thought it was a nice visual for a broken heart.
Pot Roast, Spaetzle, popovers, and peach coulis
Published by nika on Friday, January 20, 2006 at 8:15 AM.
Pot Roast with Cheese Popovers, Spaetzle, Carrots, and Peach Coulis
Pot Roast
Ingredients:
Pot Roast (a size that fits you pot and appetite, mine was just 3 pounds or so)
1 large white onion
3 cloves garlic
1 small packet Goya Azafran
1 small packet Goya powdered chicken stock
1 small can tomato paste
1 medium can stewed tomatos with italian herbs
1 large can of diced tomatos.
1 medium size packet of baby carrots
Directions:
Brown pot roast in heavy pot (that has a lid), remove once browned.
Saute onions, garlic, and goya seasonings on medium low heat, scraping up bits of meat browning on bottom of pot.
Once onions and garlic are translucent, add tomato products and bring to a boil.
Add meat back to pot, cover, and simmer for at least 4 hours.
Serve with spaetzle and cheese popovers.
Spaetzle
Ingredients:
3 cups flour
4 whole eggs
1 tsp salt
1 tsp nutmeg
1/2 cup water
Boiling water (I added stock to add flavor)
Directions:
Whisk eggs, add salt and nutmeg, 1/2 cup water, and mix well.
Add 3 cups flour, mix.
If you want to cut the on a board, add additional water to make a rollable dough (you may not need to add water to do this)
If you want to push it through a spaetzle maker or collander, add water until it is thin enough to push through the holes of the maker/collander with a spatula.
Bring water/stock to a boil and add batter to the liquid.
When spaetzle float to the top they are done.
You can remove to cold water and then saute in butter when ready to serve.
Popovers
I used King Arthur Popover quick mix, awesome stuff!!!!
(Buy it here)
I also added shredded cheese, as per the package.
Peach Coulis
Ingredients:
1 Peach (canned ok)
3 T sugar (I used demarara)
dash cinnamon
Directions:
Mix these ingredients together in an oven proof bowl, heat in oven while popovers are cooking, until it reduces to a thick sauce consistency.
Strain (or not, depending on the consistency you wish).
Serve on plate.
Star light, star bright
Published by nika on Thursday, January 19, 2006 at 8:12 AM.
Making your own lolipops (candy and cookie) can lead to an excessive number of uneaten pops around the house.
I learned alot from making this batch of lollipops, mainly that I should have added corn syrup to my previous batch of cranberry chocolate candies (corn syrup is magic when it comes to stabilizing a syrup that you are cooking down for candies. Otherwise, you get massive crystalization at a drop of a hat, a sad thing).
A Persistent Memory of Spring
Published by nika on Wednesday, January 18, 2006 at 9:28 AM.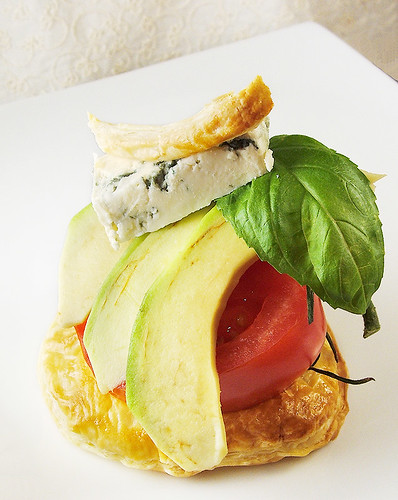
As I look out at our frozen land, I can see that hard crusts of cheerless ice coats just about everything.
In an attempt to escape this reality, if just for a few bites, I created this snack.
It delivers the mellow green goodness of avocado, the delicate creamy flavors of gorgonzola, the bright sun of basil, and the juicy fruitiness of the tomato.
100 years ago, these foods would not have been accessible to people who lived in this area. Back then, I would be "savoring" leathery turnips and somewhat dehydrated potatoes from the root cellar.
Love affair with chocolate
Published by nika on Tuesday, January 17, 2006 at 8:28 AM.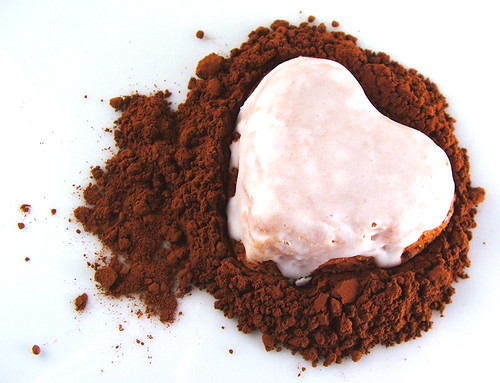
In the run up to St Valentines Day, I always "reconnect" with chocolate, a mixture that we take for granted. Hopefully, I will be able to capture some of that relationship and background here in the coming days.
Does My Blog Look Good In This 2006 #1
Published by nika on Monday, January 16, 2006 at 12:33 PM.
Ok all, I just wanted to add to the collective web-stream to let you know about the newest edition of "Does My Blog Look Good In This" (DMBLGIT) #1 for 2006 at spittonextra.
From the site we have:
Be sure to go and submit your entry for DMBLGIT!
From the site we have:
Only photographs posted to a blog during December 2005 are to be submitted and they must be on a food/drinik theme. Images have been resized to a standard width so should be viewed on their original posting to be fully appreciated.
Be sure to go and submit your entry for DMBLGIT!
White Truffle Surprise
Published by nika on at 9:12 AM.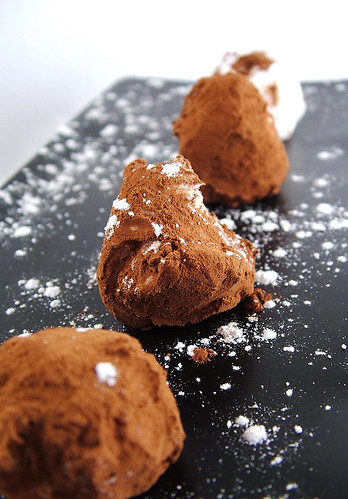
Someone wrote in a comment on another post that they were interested in the recipe for this. Its surprise because you may not have guessed what I made it from. I dont claim that this is the pinnacle of haute chocolate! :-)
White Truffle Surprise
Ingredients:
Powdered chocolate (Hershey's Dutch)
Store bought frosting
Directions:
Scoop up small balls of chilled frosting and put on a foil or parchment sheet. You might want to add other things to your frosting like nuts, chocolate chips, candies, skys the limit!
Put in the freezer to cool further/ harden somewhat.
Put some chocolate powder in a small bowl, roll the frosting balls and serve up! I would suggest doing this right before serving as these guys are very delicate.
Enjoy!
Let me know if you make them and what you think.
That time is almost here again
Published by nika on Sunday, January 15, 2006 at 7:18 PM.
I plan on having more fun with Valentines Day this year, how about you?
Adult Tater Tots - Gorgonzola Melt
Published by nika on at 10:05 AM.
Baked tater tots with a gorgonzola crumble.
Tater tots are not just for kids anymore.
Odd Fruits: Kiwano (Well Fed Network Article)
Published by nika on Saturday, January 14, 2006 at 12:59 PM.
If you have not visited the Well Fed Network yet, drop that saucier, drop that piping bag, drop that microplaner grater for goodness sakes and go visit!
There, you will find a lot of very fresh material, writing, recipes, reviews, cocktail mixological magic and several articles by me, including the following. Enjoy.
Visit the Well Fed Network!
Odd Fruit: Kiwano Fruit - Horned Melon
These days big supermarket chains are selling small numbers of "odd fruits" in the produce section. Maybe the store is trying to compete with the large variety of fruits at upscale grocers or perhaps they think that these fruits are in demand by the "ethnic" shoppers in the area. Maybe they figured out that some people will inevitably become jaded with the MacIntosh and Clemintines they push every day. Some days when I'm shopping, I'm so repulsed by the hot house tomatoes and drab green asparagus bundles soaking in murky water, I check out the odd fruit. Usually, I stare at the display a while, pick up a few fruits, try to imagine what lies inside the rind, and consider buying one to get some spice into the supermarket cart.
That's how I found myself with a Kiwano (Cucumis tuliferus). This fruit is also known as a Horned Melon, African horned cucumber or melon, jelly melon, hedged gourd, or English tomato. (Kiwano Wikipedia entry)
The rind is a stunning orange-yellow color with spikes. When you cut into it you find the most improbable of evolution's gifts: little seeds surrounded by livid green gelatinous material. When I was taking the photo I was entranced by the clarity of the gel, the vivid colors, and the spikes on the rind. It looks like it should taste like a green apple Jolly Rancher, but in fact it has a muted, cucumber-like flavor.
Should a kiwano find its way into your cart, the following recipes may give you some ideas for using this unusual fruit.
Recipes:
Even the USDA says this fruit is rather more like a cucumber in taste and perhaps should be considered in cucumber recipes, such as raita.
I found the following recipe for a Kiwano Raita by Chef Norman Van Aken in his book The Great Exotic Fruit Book: A Handbook of Tropical and Subtropical Fruits with Recipes.
Kiwano Melon (Horned Melon) with Chile de Arbol Raita
Ingredients:
1 Kiwano/Horned Melon - cut in half, flesh scooped out and roughly chopped (about 1/2 cup)
1/4 cup red onion finely chopped
1/2 cup plain yogurt
1/4 cup sour cream
1/2 teaspoon black mustard seeds
1/4 teaspoon coriander seeds
1/2 teaspoon cumin seed
1/4 teaspoon black peppercorns
1/8 teaspoon garam masala
1/8 teaspoon chile de arbol
Salt to taste
1/2 tablespoon cilantro leaves, roughly chopped
Directions:
Squeeze the kiwano flesh over a bowl and collect the juice and seeds.
Discard the fibrous pulp. Add the onion, yogurt, and sour cream to the kiwano and mix together.
Combine the mustard, cumin and corander seeds with the peppercorns in a dry skillet. Toast until fragrant and transfer to a spice grinder. coarsely grind and add the yogurt mixture. Add the garam marsala, chile powder, salt, and cilantro, and thoroughly combine. Keep covered in the refrigerator.
Another recipe from Chef Van Aken’s book is -
Secret of Paradise Ice Cream Dessert
You'll need one large kiwano, one small tub of banana yogurt, honey to taste, and vanilla ice cream. Cut fruit in half and remove pulp. Mix honey, yogurt, and pulp. Pour into kiwano half-shell. Add ice cream, whipped cream, and a cherry.
Books and Resources of Interest
The Great Exotic Fruit Book: A Handbook of Tropical and Subtropical Fruits with Recipes.
Purdue University puts out a rather long kiwano fact sheet that will help you in your post-graduate Kiwano studies.
Other Kiwano recipes
Flounder with Kiwano Salsa (halfway down the page) from the Charleston Seafood Company.
A huge list of Kiwano based drinks at "Drinks to Infinity and Beyond".
Bananas Foster en croute
Published by nika on at 10:01 AM.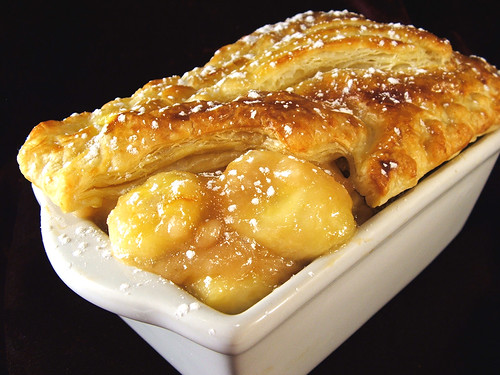
Bananas Foster en croute - divine bananas and caramel sauce.
template change
Published by nika on Friday, January 13, 2006 at 6:41 PM.
Hope that this template modification is acceptable in all browsers and is easier on the eyes :-)
Zuchette
Published by nika on at 8:49 AM.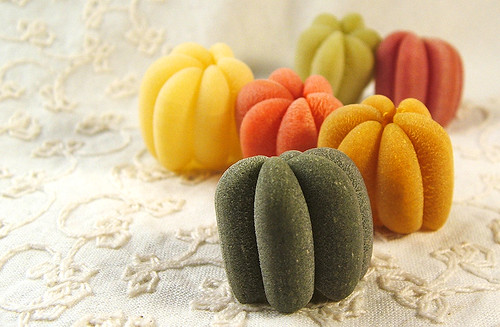
Found this curious pasta at the local whole foods store.